Coliform Bacteria in Ambient Water or Iced Tea
Background on Bacteria:
The world around us contains many species of bacteria
including some which we consider beneficial and others which we recognize as
harmful. In 1970, the first Earth Day was celebrated to focus our attention
on a number of pressing environmental issues, many of which are still of
concern over twenty years later. One such concern is the quality of sewage
treatment and what is being dumped into the water we use for drinking,
bathing, and recreational purposes. Human intestines harbor a number of
species of bacteria, many of which can cause serious illnesses if ingested
and/or absorbed into other parts of the body. Because of campers who do not
properly dispose of their wastes, even the water in our wilderness areas is
unsafe to drink without first being treated. The cholera epidemics common
in the 1800s were caused by ingestion of contaminated water, foods washed in
contaminated water, and/or seafood from contaminated water because current
sewage and water treatment practices were not in effect then. Today,
however, many people question the safety of the leftovers or even raw
sewage which our sewage treatment plants routinely put into our water.
Interestingly, some recent researchers have had excellent success using a
greenhouse-type set-up or other set-up involving plants to turn sewage into
crystal-clear water, unlike our conventional sewage treatment plants and
at a lower cost! For further information, see Garbage Magazine, Vol. II,
no. 1 (J/F 1990).
 Humans have long recognized the dangers of drinking water
which is contaminated with fecal waste. Major diseases which are spread in
this manner include cholera, salmonellosis, dysentery, polio, etc. Mammalian
fecal wastes carry large numbers of bacteria which are capable of using
lactose (milk sugar) as a carbon source. These lactose-fermenting bacteria
can be used as indicators of contamination, and are termed
lac+ or coliform (colon-dwelling) bacteria.
Non-lactose-fermenting bacteria are termed lac.
Humans have long recognized the dangers of drinking water
which is contaminated with fecal waste. Major diseases which are spread in
this manner include cholera, salmonellosis, dysentery, polio, etc. Mammalian
fecal wastes carry large numbers of bacteria which are capable of using
lactose (milk sugar) as a carbon source. These lactose-fermenting bacteria
can be used as indicators of contamination, and are termed
lac+ or coliform (colon-dwelling) bacteria.
Non-lactose-fermenting bacteria are termed lac.
Agar, a polysaccharide (poly = many,
sacchar = sugar) obtained from certain red algae, is used to solidify
a nutrient solution. Agar will not melt until the temperature of the
solution is near boiling, but will solidify when cooled to around 40° C.
By autoclaving (auto = self; clavi = key) the medium,
heating it under pressure, any existing bacteria in the solution are killed.
The resulting agar plate can then be inoculated (in = in, into,
on; ocul = eye) with the desired species of bacteria. Agar plates
can be exposed to air, water, body tissue, etc. to sample the bacterial
species living there or they can be used to grow a single bacterium
species.
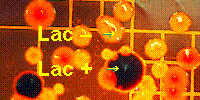 A differential medium called Levine EMB Agar can be
used to count the number of lac+ bacteria. This medium contains
1% lactose and two dyes, eosin and methylene blue, in
addition to nutrients and agar. Bacteria, such as Escherichia coli
(named for Escher, who discovered it and called E. coli for short),
which ferment the lactose will become purple (with a metallic green sheen in
especially bad ones such as E. coli) while lac
colonies, such as Salmonella sp. (named for Dr. Salmon, not the fish),
will be pink (although not necessarily safe). Therefore, by spreading a
sample containing a known quantity of water (usually 0.1 mL) on the medium
and incubating it until colonies have formed, the number of coliform bacteria,
and therefore the degree of contamination, can be estimated (expressed in
bacteria per 100 mL of water).
A differential medium called Levine EMB Agar can be
used to count the number of lac+ bacteria. This medium contains
1% lactose and two dyes, eosin and methylene blue, in
addition to nutrients and agar. Bacteria, such as Escherichia coli
(named for Escher, who discovered it and called E. coli for short),
which ferment the lactose will become purple (with a metallic green sheen in
especially bad ones such as E. coli) while lac
colonies, such as Salmonella sp. (named for Dr. Salmon, not the fish),
will be pink (although not necessarily safe). Therefore, by spreading a
sample containing a known quantity of water (usually 0.1 mL) on the medium
and incubating it until colonies have formed, the number of coliform bacteria,
and therefore the degree of contamination, can be estimated (expressed in
bacteria per 100 mL of water).
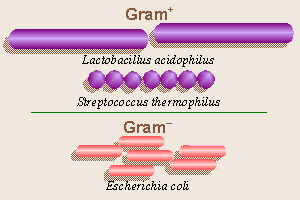 When diagnosing and treating diseases caused by bacteria, it
is useful to match the disease bacterium with an antibiotic (anti =
against, opposite; bios = life) that will kill it. A Danish physician,
Hans Christian Gram, developed a method for distinguishing between bacteria
with two types of cell walls. Gram-positive bacteria have a lot of
peptidoglycan in their cell walls, and therefore will retain a violet
dye with which they are stained, while Gram-negative bacteria, having
very little peptidoglycan, will not stain purple and are subsequently
counterstained with a red dye. The antibiotic penicillin (penicill =
a pencil, brush) inhibits production of peptidoglycan, the main chemical from
which bacteria manufacture their cell walls (especially prevalent in cell
walls of Gram-positive bacteria), and thus, is effective against a wide
variety of Gram-positive bacteria, including many Staphylococci and
Streptococci (staphylo = a bunch of grapes; strepto =
bent, twisted, pliable; coccus = a berry), but not very useful against
Gram-negative bacteria. Thus, if you have a sore throat, a good doctor
should do a throat culture before prescribing antibiotics, rather than just
giving you penicillin and risking either an allergic reaction or the
development of resistant bacteria. EMB agar selectively inhibits the growth
of Gram+ bacteria and allows only Gram bacteria to
grow, while the bacteria in yogurt are primarily Gram+ bacteria
(therefore unable to grow on EMB agar),
thus it is useful to study these two sources to compare Gram+ and
Gram bacteria. The dyes in EMB medium, besides distinguishing
between lac+ and lac bacteria, also specifically
inhibit the growth of Gram+bacteria. Thus, all the bacteria
which will grow on the plates we will making will be Gram.
When diagnosing and treating diseases caused by bacteria, it
is useful to match the disease bacterium with an antibiotic (anti =
against, opposite; bios = life) that will kill it. A Danish physician,
Hans Christian Gram, developed a method for distinguishing between bacteria
with two types of cell walls. Gram-positive bacteria have a lot of
peptidoglycan in their cell walls, and therefore will retain a violet
dye with which they are stained, while Gram-negative bacteria, having
very little peptidoglycan, will not stain purple and are subsequently
counterstained with a red dye. The antibiotic penicillin (penicill =
a pencil, brush) inhibits production of peptidoglycan, the main chemical from
which bacteria manufacture their cell walls (especially prevalent in cell
walls of Gram-positive bacteria), and thus, is effective against a wide
variety of Gram-positive bacteria, including many Staphylococci and
Streptococci (staphylo = a bunch of grapes; strepto =
bent, twisted, pliable; coccus = a berry), but not very useful against
Gram-negative bacteria. Thus, if you have a sore throat, a good doctor
should do a throat culture before prescribing antibiotics, rather than just
giving you penicillin and risking either an allergic reaction or the
development of resistant bacteria. EMB agar selectively inhibits the growth
of Gram+ bacteria and allows only Gram bacteria to
grow, while the bacteria in yogurt are primarily Gram+ bacteria
(therefore unable to grow on EMB agar),
thus it is useful to study these two sources to compare Gram+ and
Gram bacteria. The dyes in EMB medium, besides distinguishing
between lac+ and lac bacteria, also specifically
inhibit the growth of Gram+bacteria. Thus, all the bacteria
which will grow on the plates we will making will be Gram.
 Knowing how to properly do Gram staining is critically
important in veterinary medicine. The last several times Ive taken ill pets
to the vet, she has done Gram stains of, for example, fecal material, and
tracked the course of the infection by the ratio of Gram+ to
Gram bacteria in that sample. Often, it was the vet techs who
actually prepared the Gram stain, and the doctor read the results, so
even people who are just vet techs need to know how to do this, too.
The decision to medicate the animal was, then, based upon that
information.
Knowing how to properly do Gram staining is critically
important in veterinary medicine. The last several times Ive taken ill pets
to the vet, she has done Gram stains of, for example, fecal material, and
tracked the course of the infection by the ratio of Gram+ to
Gram bacteria in that sample. Often, it was the vet techs who
actually prepared the Gram stain, and the doctor read the results, so
even people who are just vet techs need to know how to do this, too.
The decision to medicate the animal was, then, based upon that
information.
Various non-pathogenic (pathos = disease, suffering;
gen = bear, produce) bacteria are widely used by biologists to study
various ecological relationships as well as genetics. Much of the research
on recombinant DNA and genetic engineering that is going on today involves
bacteria as the experimental organisms (non-pathogenic strains of E. coli
are frequently used for this). Various bacteria are aerobic, anaerobic
(aer = air, atmosphere, oxygen; an = not, without), able to
digest certain sugars like lactose that others cannot, able to live in
certain salt concentrations or pH, have different temperature requirements,
etc. These various species can, thus, be used either to demonstrate these
ecological conditions or to test for them in the world around us. For
example, a stagnant pond or well can accumulate anaerobic bacteria at the
bottom.
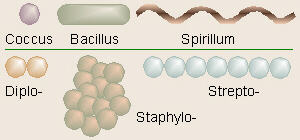 Bacteria (bacter = a rod, staff) usually are one of
three basic shapes: coccus or sphere, bacillus or rod, and
spirilla or corkscrew (bacill = a little stick; spiro
= a spiral, coil). These can be clustered like grapes (staphylo-),
linked together in a chain (strepto-), or double (diplo- =
double, two) or they can live singly. Most bacteria, however, are too small
to see clearly even at 400×, thus the oil immersion objective is used. The
100× oil immersion objective lens requires the use of a special oil between
the lens and the slide that can damage normal 4×, 10× or 40× objectives.
Properly used, the oil immersion lens enables the viewer to see an object
magnified 1000 times life size, but improper use could damage this expensive
lens and/or other parts of the microscope.
Bacteria (bacter = a rod, staff) usually are one of
three basic shapes: coccus or sphere, bacillus or rod, and
spirilla or corkscrew (bacill = a little stick; spiro
= a spiral, coil). These can be clustered like grapes (staphylo-),
linked together in a chain (strepto-), or double (diplo- =
double, two) or they can live singly. Most bacteria, however, are too small
to see clearly even at 400×, thus the oil immersion objective is used. The
100× oil immersion objective lens requires the use of a special oil between
the lens and the slide that can damage normal 4×, 10× or 40× objectives.
Properly used, the oil immersion lens enables the viewer to see an object
magnified 1000 times life size, but improper use could damage this expensive
lens and/or other parts of the microscope.
Materials Needed:
Part A:
- creek water or iced tea sample(s)
- sterile EMB plates
- test tube rack
- 70% EtOH
- Bunsen burner
- 95% EtOH in beaker
- sterile 0.1 mL pipets
- glass or metal spreader
- used pipet container
- turntable
- wax pencil
- 37° C incubator
- microscope slide
- methylene blue
- small amount of yogurt
- inoculating loop
- microscope
- immersion oil,
- lens paper
Part B:
- incubated EMB plates
- colony counter
- opt. clicking counter
- yogurt
- wax pencil
- microscope slide
- Bunsen burner
- inoculating loop
- crystal violet (Huckers stain)
- Grams iodine stain
- 95% EtOH squirt bottle
- Safaranin O counterstain
- microscope
- immersion oil
- lens paper
Procedure:
Collection of Samples
- For each creek water source you will
be testing, you should
take home a screw-top vial. If you are planning on obtaining iced tea, that
may be stored in the cup in which it is served to you. Discuss with your
classmates where everyone is planning to obtain samples so there is no
duplication. You may bring in samples of creek water or iced tea. Note
that these screw-top vials are now sterile do not open them until ready
to fill them. As you obtain the vials to take them home, before you leave
the lab, tighten the cap on each one so it doesnt fall off.
- Water samples must be taken from a
MOVING WATER SOURCE
stream or creek not a pond or puddle. Suggestion: if there are enough
vials and EMB agar plates, take samples above and below a sewage outlet.
With the vial underwater, unscrew the top and fill the tube ½ full from
midstream, then replace the top before raising the vial out of the water.
Do not contaminate your sample with sediment from the stream bottom. Cap
immediately (before removing from the creek) and leave the cap on. Collect
samples as close as possible to plating time. If you must collect your
samples prior to the day of lab, you will need to refrigerate them until
you bring them into lab. Label the tubes and record date and source in
your lab notebook as well.
- Again, iced tea does not need to be
transferred to a
screw-top vial. Simply bring the tea in the cup in which it was
purchased.
Part A Inoculation of Plates
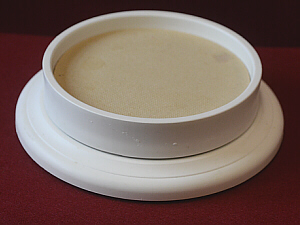
This procedure assumes that sterile EMB agar plates were
previously prepared by the lab staff and are available for your use. The
techniques learned in this lab are extremely important in microbiological
labs, and are crucial skills in aseptic technique. Be patient and take time
and care to learn proper technique at the beginning to help establish good
technique for the rest of your life. Compare these detailed steps with the
demonstration given by the instructor. Go slowly at the beginning, and
verbally (not physically) assist your fellow students as they work through
the steps. Using sterile technique as outlined below, spread 0.1 mL
of sample on an EMB agar plate.
In this portion of the lab, Bunsen burners and 95% EtOH will
be in use at the same time. Extreme care should be exercised because the
ethanol is very flammable.
- Begin with a sterile field by wiping
one end of the desk with 70% EtOH. Survey the field and mentally go through
the steps, ensuring that each piece of equipment is conveniently placed.
Place your screw-top sample vials in a test tube rack and loosen, but do not
remove, their caps.
- Optionally, clean the exterior of
the plates with EtOH. Label the plates with the date, your initials, the
sample source, and the volume plated (0.1 mL). Also enter the date and
source in your notebook.
- Select a pipet. Remember, these are
sterile, so do not set it down anywhere or touch anything to/with the tip.
Insert the top end of the pipet into the pipet filler. Pass the tip of the
pipet through the flame of a Bunsen burner to make sure its sterile.
- Pick up the first vial with the
non-writing hand, and grip the cap with the little finger of the pipet hand
to twist it off. DO NOT LAY THE CAP DOWN. The little finger of the writing
hand should be used to hold the cap. Flame the neck of the vial,
then set the vial back in the test tube rack.
- Use the pipet filler to suck a
slight excess of sample into the pipet. Use extreme caution because these
0.1-mL pipets are very small in diameter, so liquid will rise in them
extremely quickly, and the meniscus is so small that it is EXTREMELY
difficult to see. Do not suck sample into the bulb or you will contaminate
the whole thing. Adjust the contents of the pipet to the desired volume
(0.1 mL). Tilt the pipet horizontally so that fluid does not escape during
transfer.
- After obtaining the sample, reflame
the lip of the vial, replace its cap, and return the vial to the test tube
rack. While doing this, KEEP THE PIPET HORIZONTAL SO IT DOESNT LEAK.
Do NOT flame the pipet or youll kill the bacteria in your sample!
- Obtain the petri dish into which
that sample is to be placed. Note that the next few steps must be done
QUICKLY, yet carefully so that the sample doesnt all soak into one place.
Use your non-writing hand to lift the lid of the petri dish just enough
to deliver the sample. Place the desired aliquot (0.1 mL) of sample onto
the plate and puff out the last drop. Replace the lid on the plate.
white turntable
black turntable
- Place the used pipet into the
designate container for future cleaning. Place the petri dish onto a
turntable.
- Obtain one of the spreaders from the
beaker of 95% EtOH, taking care to avoid getting alcohol on the end youre
holding. Let the spreader mostly drip-dry, then pass it ONCE through the
flame of a burner to ignite any remaining alcohol and let it burn dry.
Do not ignite it while it is still very wet, DO NOT HOLD THE FLAMING
SPREADER OVER THE BEAKER OF EtOH, and WATCH OUT FOR YOUR FINGERS!!! Do
not set it down now that it is sterile.
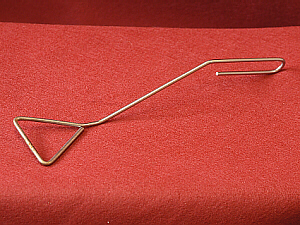
metal spreader
- When the flaming has stopped, touch
the spreader to the inside of the petri dish lid to cool it. Then, spin the
turntable with the non-writing hand (which is also holding the lid above the
petri dish do not set it down anywhere), and rotate the spreader
on the surface of the agar with the writing hand in the opposite direction of
the spinning motion. This will spread the sample over the agar. When
evenly spread, close the dish and return the spreader to the beaker of
EtOH.
- Incubate at 37° C for a maximum of
two days. You must plan to count colonies within two days or it will be
impossible to do.
Use of Oil Immersion Lens
Make a smear slide of yogurt using the following procedure
(similar to the buccal smear done last semester):
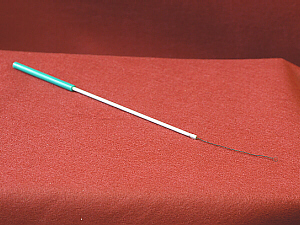
inoculating loop
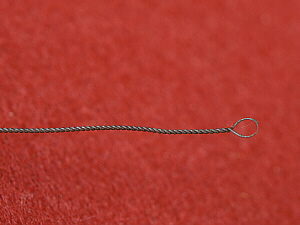
inoculating loop close-up
- Using an inoculating loop and
proper sterile technique, spread a small drop of the yogurt thinly over about
a 1-cm2 area and it let dry. Remember to flame the loop before
and after use to avoid contamination. Do not set down an unsterilized
loop.
- When dry, fix the smear by
gently passing the slide through the flame of a burner. Do not overheat
it shouldnt be hot.
- Cover the smear with methylene blue
and let it sit one minute (time it).
- Gently rinse off the stain with tap
water from a squirt bottle.
- If needed to dry it, gently blot the
slide around the edges with a paper towel, being careful not to remove the
specimen.
- When the slide is dry, examine under
40×, 100× and 400×. Draw and label what you see at each power.
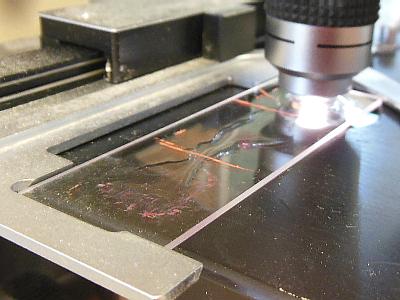
Examine this slide using the oil immersion lens as follows.
It is imperative to follow directions here or the microscope could
be damaged. Obtain the bottle of immersion oil from your drawer. This is a
special oil that has a refractive index (a measure of how much a
substance bends light that is passing through it) which is equal to that of
glass. Consequently, notice that the glass dropper attached to the lid
disappears when it is submerged in the oil (if you submerge glass into
water, you can still see it and it appears bent at the air-water
boundary).
- At 400×, find a suitable place on the
slide for further observation. DO NOT MOVE THE FOCUS adjustment once it is
in focus at 400× DO NOT MOVE OR ADJUST THE STAGE HEIGHT!!!
- Rotate the nosepiece part way so that
the oil immersion lens is approaching the specimen, but not yet locked into
place. Put a small drop of immersion oil on the spot on the slide that you
wish to view (in the center of the stage). Gently and carefully, rotate the
oil immersion lens until it clicks into place and is submerged in the droplet
of oil.
- USE ONLY FINE FOCUS ADJUSTMENT AT
1000×. NEVER SWITCH BACK TO A REGULAR LENS ONCE YOU HAVE APPLIED OIL
BECAUSE OIL WILL DAMAGE THOSE LENSES. NEVER USE THE OIL IMMERSION LENS
WITHOUT OIL.
- If you wish to examine more than one
area of a slide, place a droplet of oil on the second specimen and carefully
move the slide over. Do not alter the focus while moving the slide. Watch
that the lens doesnt run out of oil as you move the slide and
that the slide doesnt scrape the lens.
- Draw what the yogurt bacteria look
like at 1000×. Do you see cocci or bacilli or spirilla? Especially if
cocci, are they single, diplo-, strepto-, or staphylococci? The tendency to
be arranged a certain way is also a species-specific trait. In the yogurt,
find and draw the Lactobacilli and the Streptococci.
- When you are done looking at the
slide, rotate the nosepiece PART way so no lens is above the slide. Lower
the stage then remove and clean the slide.
- Make every effort not to spill oil
elsewhere, and immediately clean up all oil spilled on the stage or other
microscope parts. You may use the lower powered objectives to focus a
second (clean) slide before switching to oil immersion to view that
slide.
- When you have finished using the oil
immersion lens for the day, carefully and gently, THOROUGHLY CLEAN ALL
THE OIL OFF IT WITH LENS PAPER ONLY make sure youre not using a
Kimwipe or anything else. Do not use anything beside lens paper on the lens.
Be careful not to get oil on the other lenses. Carefully check the
microscope for any spilled oil (or other substances) and clean up any spills.
Make sure you have done everything on the microscope-storage checklist before
putting the microscope away.
Part B Colony Counting
NO EATING OR DRINKING should take place during this
lab exercise because of possible contamination.
Because we will be working with unknown bacteria, some of which could pose a
health hazard, NO FOOD OR DRINKS should be consumed during these labs.
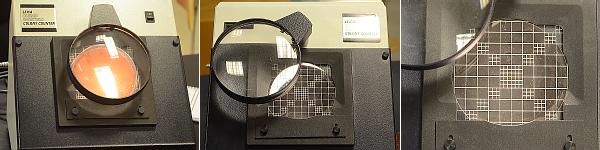
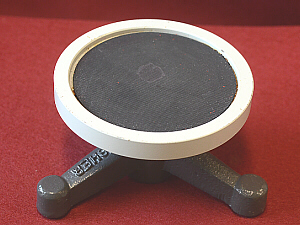
If the bacteria on your plate are numerous, or hard to count
for some other reason, you may use a colony counter to help view them. The
plate is placed on the grid, and the light turned on. The height of the
magnifying glass may be adjusted to better view the colonies. If your plate
has a moderate number of colonies, you should attempt to count them all.
However, if your plate has a lot of colonies, first count how many squares
on the colony counters grid are equivalent to the surface area of the plate.
Then, count the number of colonies in several, representative squares,
average that number, then multiply by the total number of squares per plate
to arrive at a close approximation of the total number of colonies on the
plate.
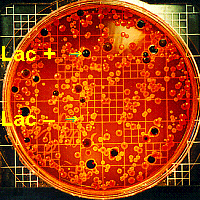
- No more than 48 hr after inoculation
of the plates, count a) the total colonies, and b) the number
of purple colonies (= coliform). In theory, each bacterium (CFU) which
landed on the plate should grow into a colony, thus the number of colonies
counted is an indication of the number of bacteria present in the 0.1-mL
sample.
- Since 0.1 mL of water was used as a
sample, multiply the number of purple (coliform) colonies by 1000 to express
your findings as coliform per 100 mL (= 1 dL) of water. A count of up to 5000
bacterial colonies per 100 mL of water is considered acceptable for
water for recreational (swimming not drinking) purposes.
- Record your data in your lab
notebook and online so they can be compared with other class members data.
Record any further notes you may take.
Gram Stain Procedure
Normally, when Gram stain is done, only a sample of the
bacteria in question (maybe from a throat culture?) is spread on a slide and
stained. However, for convenience, we will be spreading three samples on the
same slide in order to more easily compare Gram+ and
Gram bacteria. Unlike what we will be doing today, it is
entirely possible to make a Gram stain of only one
sample, and thats the way it is usually done.
Recall that the Lactobacillus sp. and Streptococcus
thermophilus present in yogurt are Gram+ while EMB agar is
selective for Gram bacteria (which simultaneously are
lac+ or lac). Thus, you will be using yogurt and one
of your coliform colonies to make a slide to demonstrate
Gram+ and Gram bacteria as follows:
- Start with a slide divided into
thirds with wax pencil lines. Label the first third as + because you will
be putting Gram+ bacteria there, the second third as , in
which to put Gram bacteria, and the third third as +/,
because on that third, you will be mixing the two together.
- On the three areas of the slide,
make smears of 1) yogurt alone, 2) coliform (coli = colon) bacteria
alone, and 3) a mixture of the two. Remember to sterilize the inoculating
loop before and after each use. Let the slide dry and fix the specimen with
a burner as before.
 Stain the slide as follows:
- Cover each smear with crystal
violet and let the slide sit for 1 min. (time it)
- Briefly rinse the slide with
tap water (squirt bottle) for no longer than 2 sec.
- Cover the smears with Grams
iodine and let the slide sit for 1 min. (time it)
- Rinse the slide gently with
95% EtOH (squirt bottle) until the blue color no longer drips from the
slide.
- Briefly rinse the slide for
2 sec. with tap water (squirt bottle).
- Cover the smears with
Safaranin O counterstain and let the slide sit for 1 min. (time
it)
- Gently rinse the slide with tap
water (squirt bottle) until the excess counterstain is gone.
- If needed, blot the edges only
of the slide dry with a paper towel. Let the actual smears air dry do
not wipe off the specimens!
 Examine the first specimen at 40,
100, 400, and 1000× (oil) to get it in focus. When applying immersion oil,
a line of oil may be drawn along the slide. That way, when you are ready
to examine the second and third regions, you may carefully just move the
slide over to a new area. Frequently, yogurt, itself, stains red (this does
not mean it is Gram), while the bacteria in it (which is what
youre looking for) stain purple. Gram-positive bacteria will look blue or
violet in color while Gram-negative ones will appear bright red. Record the
results and draw pictures of what the bacteria look like at 1000×. Indicate
(in writing and/or with colored pencils) what color(s) the bacteria were.
Clean the slide with soap and water.
Examine the first specimen at 40,
100, 400, and 1000× (oil) to get it in focus. When applying immersion oil,
a line of oil may be drawn along the slide. That way, when you are ready
to examine the second and third regions, you may carefully just move the
slide over to a new area. Frequently, yogurt, itself, stains red (this does
not mean it is Gram), while the bacteria in it (which is what
youre looking for) stain purple. Gram-positive bacteria will look blue or
violet in color while Gram-negative ones will appear bright red. Record the
results and draw pictures of what the bacteria look like at 1000×. Indicate
(in writing and/or with colored pencils) what color(s) the bacteria were.
Clean the slide with soap and water.
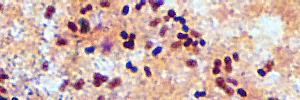 |
 |
| Gram positive bacteria (purple) in yogurt |
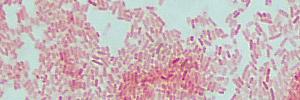
Gram negative bacteria (pink) |
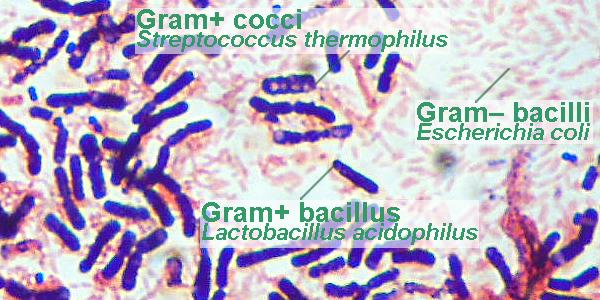 |
| mixture of Gram positive and Gram negative bacteria |
- Clean up. Dispose of used petri
dishes in the biohazard bag. Place unused, poured plates where requested so
that they can be saved for later use.
- After you complete this part on
Gram stain, it would, perhaps, be helpful to make a chart/table of bacterial
shape (coccus, bacillus, etc.), cell arrangement (strep-, staph-, etc.), and
whether the bacterium is Gram+ or Gram, plus any other
pertinent information such as colony color or whatever.
Other Things to Include in Your Notebook
Make sure you have all of the following in your lab notebook:
- all handout pages (in separate protocol book)
- in-class notes on how-to
- all notes you take as you read through the Web page and/or
during the introductory mini-lecture
- all notes and data you gather as you perform the experiment
- notes on where you obtained your samples
- colony counts for your plates (Lac+ and total counts), and calculations of number per 10 mL
- notes on how to use the oil lens
- notes on your Gram staining procedure and which bacteria are
Gram+ and Gram
- labeled drawings (yours!) of
- drawing of your results (your finished plates) and/or
optional xerox, scan, or photo of your plates
- drawings of any new equipment (inoculating loop)
- drawings (at 1000×) of any/all bacteria examined under
the microscope (optionally colored to indicate
Gram+ and Gram)
- if done, notes on any other Monerans examined (blue-green algae, Rhizobium, etc.)
- print-out of class data for creek water and iced tea counts
(available online)
- conclusions & suggestions
- (transfer students are encouraged to also include drawings of any
new equipment, especially indicating the actual markings/divisions,
so you remember what they look like)
- answers to all discussion questions, a summary/conclusion in your
own words, and any suggestions you may have
- any returned, graded pop quiz
Copyright © 2011 by J. Stein Carter. All rights reserved.
Based on printed protocol Copyright © 1980, 1989 D. B. Fankhauser
and additional information Copyright © 1990 J. L. Stein Carter
Chickadee photograph Copyright © by David B. Fankhauser
This page has been accessed  times since 5 Sep 2011.